
Geek gaming scenics refers to small, crafted environments that people use with tabletop games, miniatures, and dioramas. The writer explains what these pieces do and why they matter for game play and display. The introduction sets expectations and shows practical value.
Key Takeaways
- Geek gaming scenics boost immersion and clarify line-of-sight, so use them to shape gameplay and player decisions.
- Choose a clear theme (urban, forest, sci-fi, fantasy) early to guide materials, color palette, and time investment for each scenic.
- Follow a step-by-step build: plan layout, pick scale, build base layers, texture, paint (prime → base → wash → drybrush), then add flock and details.
- Keep costs manageable by starting with essential tools (craft knife, glue, acrylics, foam) and track time and expenses per scenic as skills grow.
- Photograph and display scenics with diffused lighting, neutral backgrounds, and miniature-eye-level camera angles, and protect pieces in foam-lined bins for transport.
What Are Geek Gaming Scenics And Why They Matter
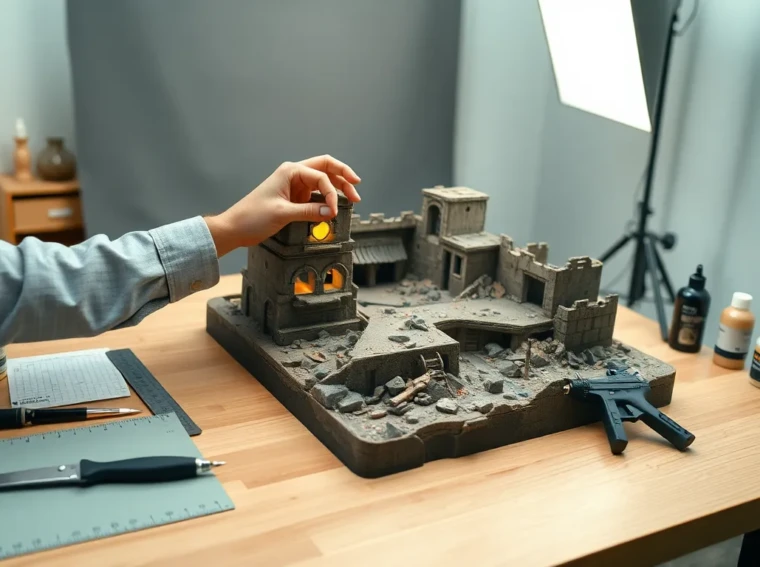
Geek gaming scenics are crafted models that represent terrain, buildings, and props. They serve as visual aids for tabletop games and as display items for collectors. Players use them to set mood, to clarify line of sight, and to boost immersion. Hobbyists use them to show skill and to express style. Designers use them to test scale and to check game balance. Scenics matter because they change how players see a board and how players interact with rules.
Popular Styles And Themes In Gaming Scenics
Builders choose a style and then they commit. Common styles include urban, ruined, forest, industrial, sci-fi, and fantasy. Each style uses a distinct color palette and set of textures. Urban scenics use concrete tones and straight edges. Forest scenics use organic shapes and layered greens. Sci-fi scenics use clean lines, LED light, and metallic paints. Fantasy scenics use stone textures, arches, and natural clutter. Theme choice guides material choice and time investment.
Essential Materials, Tools, And Budgeting
A basic list keeps costs down. Essential materials include foam board, PVA glue, acrylic paints, and basing flock. Essential tools include a craft knife, cutting mat, hot glue gun, and a set of brushes. Hobbyists add tools like pin vises and airbrushes as they advance. Budgeting starts with a small kit and grows with skill. Many builders track costs per scenic to plan projects.
Step-By-Step Build Process For A Tabletop Scenic
Design the layout on paper first. Pick a scale and mark measurements. Cut base shapes from foam board. Glue the layers to build height. Shape terrain with a carving tool or sandpaper. Add plaster or sculpt paste for texture. Paint base colors and then add drybrush layers. Glue static grass, flock, and small details last. Let the scenic dry fully before handling. This order keeps edges clean and paint layers intact.
Lighting, Painting, And Weathering Techniques
Use thin paint layers to keep detail. Start with a primer and then apply base coats. Use washes to define crevices and drybrushing to highlight raised areas. Apply weathering powders to add dust and rust. Add small LED lights to show windows or control panels. Position lights behind translucent parts for soft glow. Seal the scenic with a matte varnish to protect paint while keeping a natural look.
Displaying, Photographing, And Using Scenics In Play
Place scenics on a stable table away from direct sun. Use risers to vary height and to show depth. For play, arrange scenics to balance cover and open space. For display, arrange a focal piece and then add smaller elements. For photos, use a neutral background and diffused light. For streams, use softbox lights and control glare with polarizing filters. Players should test sight lines before a game starts.
Where To Buy, Learn, And Join Communities
Choosing Between Buying And Making: Pros, Cons, And Time Estimates
Buying saves time and gives consistent detail. Making saves money and gives control over design. Buying takes hours for sourcing and assembly. Making takes days to weeks depending on complexity. A simple kit can take two to four hours. A detailed diorama can take twenty hours or more.
Common Materials And Where To Source Them
Builders buy foam at craft stores. They buy paints at art shops. They buy foliage, flock, and miniature bits at hobby shops. They buy LEDs and wires at electronics stores. Online marketplaces list specialist terrain items for fast delivery.
Designing A Layout And Scale Considerations
Choose scale to match miniatures. Confirm miniature height and adjust door and window sizes. Use templates to test fit and sight lines. Keep pathways wide enough for game tokens and tape measures.
Base Construction And Terrain Shaping
Cut a rigid base from plywood or foam board. Glue a cork or foam layer for initial contours. Sculpt hills and craters with modeling paste. Sand edges smooth and then add texture with grit or sand.
Detailing, Flocking, And Scenic Extras
Add small props like crates, barrels, and signs to add story. Glue fine flock and static grass with diluted PVA. Add tiny decals and posters for life. Use washes to unify color and to age details.
Practical Lighting Setups For Photos And Streams
Place two soft lights at forty-five degree angles. Use a backlight to separate the scenic from the background. Dim LEDs to avoid overexposure. Use neutral white bulbs for accurate color.
Camera Settings, Composition, And Backgrounds
Use a low ISO for clean images. Use a small aperture to keep the scene sharp. Use a tripod to avoid blur. Place the camera at miniature eye level for realism.
Storage, Transport, And Maintenance Tips
Wrap scenics in foam for transport. Store pieces in stackable bins to save space. Dust scenics with a soft brush and avoid water on painted surfaces. Check LEDs and replace batteries before events.
Top Online Stores, Marketplaces, And Craft Suppliers
Major marketplaces carry a wide catalog. Specialist stores offer resin and laser-cut kits. Local hobby shops stock paints and glues. Compare prices and read reviews before buying.
Tutorials, YouTube Channels, And Step Guides Worth Following
Many channels show step builds and time-lapse painting. Look for creators who show tools and settings. Follow step-by-step guides to learn techniques quickly.
Local Clubs, Forums, And Conventions To Meet Other Builders
Local clubs host build nights and contests. Forums let members share photos and tips. Conventions showcase builders and let people buy and sell scenics.