Your oven’s been through the gaming marathon sessions, leftover pizza boxes stacked nearby, the occasional spill from late-night snacking. But unlike clearing a raid, tackling that grimy oven has felt impossible. Enter steam cleaning: the meta shift for oven maintenance that’s been quietly dominating household cleaning discussions. If you’ve been grinding with chemical cleaners that leave residue, burn your hands, and take forever, it’s time to level up. Steam cleaning offers a faster, safer, and more effective approach that actually works without the toxic fumes. Whether you’re prepping for guests or just tired of staring at baked-on grime, this guide breaks down everything you need to know about steam cleaning your oven, exact steps, gear requirements, and pro strategies to make it a breeze.
Key Takeaways
- Steam cleaning your oven uses heat and moisture at 100°C (212°F) to break apart stubborn buildup faster and safer than toxic chemical cleaners, with no harmful fumes or residue.
- A mid-range handheld steam cleaner ($80–$150) is the ideal investment for most households, paying for itself within a year while also cleaning stovetops, counters, and tile.
- The steam cleaning process takes 20–40 minutes: work methodically from top to bottom, wipe as you go with microfiber cloths, and use pre-soaking and extended steam exposure on stubborn spots.
- Prevention is more effective than heavy cleaning—line your oven bottom, wipe spills immediately, and use splatter guards to dramatically reduce future buildup and cleaning time.
- Always use distilled water, maintain proper ventilation, and avoid common mistakes like using tap water, maximum heat settings, and steaming while the oven is hot to ensure safety and equipment longevity.
Why Steam Cleaning Is The Best Oven Cleaning Method
The Science Behind Steam Cleaning
Steam cleaning relies on one brutal mechanic: heat and moisture working together to break apart stubborn buildup. When water reaches 100°C (212°F), it vaporizes and penetrates cracks and crevices that chemical cleaners miss. The steam softens grease, loosens char, and forces debris away from surfaces, basically applying overwhelming pressure to weaken your enemy’s defenses.
The magic happens at the molecular level. Grease is hydrophobic (water-repelling), but steam’s heat energy overcomes this resistance. Baked-on food particles lose their structural integrity under sustained thermal assault. Unlike passive chemical reactions, steam cleaning is active and immediate. You’re not waiting for a product to “sit” for 12 hours: results happen in minutes as the moisture penetrates and lifts grime.
Temperature and humidity matter. Industrial steam cleaners reach 150°C+, creating pressure that’s particularly effective against carbonized buildup. Home units are lower-temp but still efficient, especially on fresh spills and moderately soiled surfaces. The process works across materials too: it’s safe on stainless steel, ceramic, and glass without damaging underlying finishes.
Advantages Over Chemical Cleaners
Chemical cleaners (oven spray, lye-based degreasers) work, but they come with baggage. You’re inhaling fumes, risking skin burns, and dealing with toxic residue that lingers even after rinsing. Steam obliterates this problem. There’s no fume inhalation, no chemical burns, and no toxic byproducts, just water vapor and gravity doing the job.
Cost efficiency is another stat worth mentioning. Bottled chemical cleaners run $10–$20 per unit and you’ll burn through them. A quality steam cleaner, a one-time investment of $150–$400, pays for itself within a year if you’re cleaning ovens semi-regularly. For households using their oven frequently, the ROI is brutal in a good way.
Environmental impact matters too. Chemical cleaners poison water systems when rinsed away. Steam uses only water, making it the eco-friendly meta. You’re not contributing to chemical pollution: you’re just converting H₂O to vapor and back again. If environmental play-style matters to you, this is the obvious choice.
Plus, steam cleaning is versatile. The same equipment handles stovetops, counters, tile, and even windows. A dedicated chemical cleaner for each surface? That’s not efficient. A single steam system? That’s a game-changer for household maintenance.
What You’ll Need To Get Started
Essential Tools And Equipment
You don’t need much, but having the right gear prevents frustration. Here’s your loadout:
- Handheld steam cleaner or steam mop (see below for selection criteria)
- Microfiber cloths (3–5 pieces: they absorb steam better than cotton)
- Cleaning scraper or plastic brush (for stubborn spots: metal scratches enamel)
- Gloves (silicone or thick cotton, steam gets hot)
- Eye protection (goggles recommended: steam can splash)
- Towels (for mopping up condensation and runoff)
- Distilled water (tap water leaves mineral deposits in some units)
- Optional: spray bottle (for pre-wetting heavy stains)
You’ll also want ventilation. Open a window or run your kitchen exhaust fan. Yeah, steam is harmless, but moisture buildup in your kitchen isn’t ideal. Proper airflow prevents mold growth and keeps the environment comfortable.
Choosing The Right Steam Cleaner
Not all steam cleaners are created equal. Your choice depends on what you’re actually using it for.
Handheld steam cleaners ($50–$200): Compact, portable, precise. These are ideal if you’re cleaning ovens, stovetops, and small surfaces. They heat up in 30 seconds to 5 minutes and deliver controlled steam bursts. Brands like Bissell and McCulloch dominate this category. Look for at least 1200W power and adjustable steam settings.
Steam mops ($100–$400): Larger units designed for floors, but they work on ovens too. They hold more water, run longer without refilling, and deliver consistent heat. If you’re also planning to clean tile floors or large kitchen surfaces, this dual-purpose approach saves money.
Commercial-grade steam cleaners ($400+): Overkill for home use, but professional-grade if you’re cleaning multiple ovens or running an airbnb situation. Pressure reaches 3+ bar, heating is instant, and uptime is excellent.
For most gamers tackling a home oven, a mid-range handheld unit ($80–$150) hits the sweet spot. You get reliable heat, compact storage, and enough power for 90% of household cleaning tasks.
Key specs to check:
- Heating time: Under 3 minutes is optimal
- Water capacity: At least 300ml for a full oven clean
- Pressure rating: 1–2 bar is standard for household units
- Temperature range: Adjustable settings (40°C to 100°C) let you dial in the right intensity
- Attachment variety: Nozzles, brushes, and cloth pads increase versatility
Read user reviews specifically about oven cleaning, some units work better on ovens than others. Gaming forums might not cover this, but How-To Geek has solid breakdowns of steam cleaner performance across household tasks.
Step-By-Step Steam Cleaning Process
Preparation And Safety Precautions
Rushing into a steam clean without setup is like starting a raid without consumables. You’ll waste time and energy.
Step 1: Empty the oven completely. Remove racks, thermometer, pizza stone, everything. Set them aside: you’ll clean them separately if needed.
Step 2: Vacuum or wipe loose debris. Crumbs and larger particles get in the way. A quick pass with a dry cloth or small handheld vacuum clears the playing field.
Step 3: Ventilate the space. Open windows, run exhaust fans, and crack a door if you have one. Steam needs somewhere to escape, or your kitchen becomes a sauna.
Step 4: Fill your steam cleaner. Use distilled water if possible: tap water works but can leave mineral scale over time. Check your unit’s manual for the exact fill line.
Step 5: Allow heating time. Most units take 1–5 minutes. Use this time to dress appropriately: gloves, eye protection, and clothes you don’t mind getting wet.
Safety rules:
- Never point steam at your face or hands directly. It’s 100°C+ and causes burns instantly.
- Keep a cooldown distance. Maintain 6–12 inches between nozzle and oven surfaces. Too close melts plastic trim.
- Test on a small area first. Unfamiliar ovens might have finishes that react poorly to sustained heat.
- Don’t use steam on damaged seals. If your oven door gasket is already compromised, steam could degrade it further.
- Check electrical cords. Moisture and electricity don’t mix. Keep steam away from power outlets and cords.
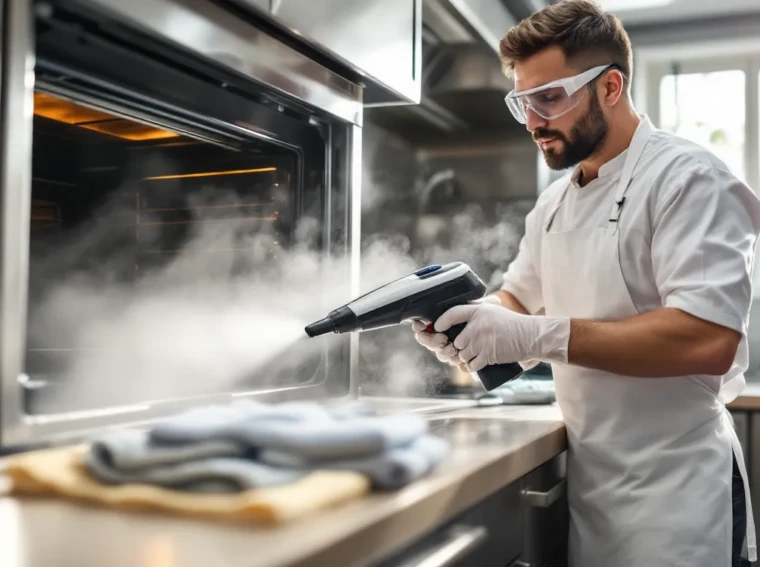
The Cleaning Procedure
Step 1: Start with the top interior surface. Steam downward from the top of the oven roof. The gravity assist helps loosen buildup and prevents water from pooling. Work in overlapping passes, think painting, not just blasting.
Step 2: Move to the sides. Angle the nozzle slightly and work methodically from top to bottom. Side walls get heavy grease accumulation, so spend 2–3 minutes per side. Let the steam soak in: patience beats rushing.
Step 3: Hit the bottom and corners. The oven floor is grimy but easier since liquids drain naturally. Don’t forget corners, they’re hotspots for carbonized food. Use the angled nozzle to penetrate crevices.
Step 4: Attack the oven door. Glass doors are visible and annoying when dirty. Steam them thoroughly, 4–5 minutes. The heat loosens stubborn buildup faster than body panels.
Step 5: Wipe as you go. Use microfiber cloths to capture loosened grime. This isn’t just for cleanliness, it prevents resoiling and lets you see what you’ve actually cleaned. Wet cloth? Swap it out.
Step 6: Second pass on problem areas. Burned-on spots near burners or heat zones need extra attention. Soften them with 2–3 additional steam passes, then scrape gently with your plastic tool.
Total time: 20–40 minutes depending on oven size and buildup severity.
Tackling Stubborn Stains And Buildup
Some spots refuse to budge. Heavy charring, years-old grease, or adhesive food residue requires tactical escalation.
Pre-soak technique: Spray stubborn areas with water using a spray bottle. Let them sit for 2–3 minutes, then hit them with steam. The pre-moisture softens the exterior, letting steam penetrate deeper. It’s like weakening enemy armor before the final strike.
Extended steam exposure: Don’t one-pass these zones. Apply steam for 5–7 continuous seconds per spot. The sustained heat does more work than quick bursts. Watch the buildup, if it’s visibly separating, you’re winning.
Scraping technique: Use your plastic scraper at a shallow angle (15–30 degrees). Push, don’t stab. Aggressive scraping scratches enamel and defeats the purpose. Gentle pressure lets the softened grime separate cleanly.
Chemical assist (if absolutely necessary): For extreme cases, apply a small amount of baking soda paste to the stubborn spot before steaming. Baking soda softens grease without toxins. Steam over it for 2–3 minutes, then scrape. This hybrid approach is your nuclear option.
Patience factor: If something’s not budging after three passes, it might need multiple cleaning sessions. Don’t burn out, ovens accumulate mess over months or years. You’re not obligated to fix it in one session. Come back tomorrow if needed.
Pro Tips For Maximum Cleaning Effectiveness
Time Management And Technique Hacks
Batch your oven cleaning with other steam tasks. Since you’ve got the unit heated up, clean your stovetop, counters, and tile while momentum is going. One heat-up = multiple jobs = efficiency gains.
Clean your racks separately. Remove them from the oven and steam them in your bathtub or shower. They’re big, awkward, and take space. This parallel-processing approach lets you focus on the oven interior without obstruction.
Use the right cloth texture. Microfiber absorbs moisture and traps particles. Cotton towels get soaked and stop working. Microfiber is non-negotiable for effective wiping.
Angle matters. Steep downward angles (60+ degrees) use gravity and heat synergistically. Horizontal or upward angles fight physics. When cleaning walls and the roof, tilt your nozzle downward.
Fresh water between major zones. If your steam unit holds 500ml, you might need to refill halfway through an average oven. Mineral deposits in the water get concentrated over time, reducing effectiveness. Fresh water = maximum output.
Pre-warm the oven. Run your oven at 100°C (low setting) for 2–3 minutes before steaming. The warmed surfaces accept steam penetration more readily, and the temperature difference is less extreme (reducing thermal shock risk).
Lighting is underrated. A phone flashlight or headlamp lets you see every grime particle. Shadows hide stubborn spots that need extra attention. Better visibility = better results.
Maintenance To Keep Your Oven Cleaner Longer
Prevention beats remediation every time. Reduce buildup and you spend less time cleaning.
Line your oven bottom with foil or a baking sheet. Spills fall onto the liner, not the enamel. Replace or clean the liner monthly instead of deep-cleaning the oven quarterly.
Wipe spills immediately when the oven cools. Fresh spills come off with a damp cloth. Baked-on messes require steam cleaning. A 30-second cleanup now saves 30 minutes later.
Use a splatter guard on your baking dishes. Pizza, casseroles, and fatty meats are the worst offenders. A foil tent or oven-safe lid contains the damage. You’ll notice dramatic reduction in ceiling and wall grime.
Run your oven’s self-cleaning cycle sparingly. Self-cleaning heats to 500°C+ and leaves ash residue. It’s effective but brutal on heating elements. If you’re steam cleaning regularly, self-clean maybe twice yearly instead of monthly.
Check your oven gasket quarterly. A damaged seal lets heat escape and moisture creep in, both degrade the oven. Replacing a gasket costs $20–$50. Ignoring it costs an oven replacement ($300+).
Store your steam cleaner properly. Empty the water tank completely after each use. Stagnant water breeds mold and mineral scale. Dry it thoroughly before storing in a cool, dry place.
Common Mistakes To Avoid
Using tap water exclusively. Mineral deposits accumulate in your steam cleaner and reduce pressure over time. Distilled water costs $2 per gallon and extends your unit’s lifespan. It’s a no-brainer investment.
Starting with maximum heat. Some ovens have plastic trim, rubber seals, or delicate finishes. High-temp steam can damage them. Start at 60–70°C and increase only if needed. You can always get hotter: you can’t un-melt plastic.
Neglecting to wipe as you clean. Leaving pools of water and loosened grime makes re-soiling inevitable. Your cloth work is 50% of the cleaning process. Don’t skip it.
Attacking the same spot obsessively. Sometimes buildup simply needs multiple sessions to fully release. Beating it with steam for 15 minutes straight wastes water and energy. One good soak per session, and come back later if needed.
Forgetting to empty the water tank. Stagnant water in a warm tank becomes a bacterial breeding ground within 24 hours. Empty it immediately after cleaning. Takes 30 seconds and prevents nasty odors.
Steaming while the oven is hot. If you’ve recently baked, let the oven cool for at least 30 minutes. Thermal shock (sudden temperature change) can crack glass doors or warp metal. Safety and longevity require patience.
Using steel wool or harsh abrasives. These scratch enamel finishes and create rough spots where grime accumulates faster. Plastic scrapers and microfiber cloths are your only tools. Respect your oven’s surface.
Not ventilating properly. All that moisture has to go somewhere. Poor ventilation means kitchen walls absorb moisture, mold growth accelerates, and the space feels clammy. Open windows and use exhaust fans, no exceptions.
Expecting perfection on first clean. Years of baked-on buildup won’t vanish in one session for every oven. Realistic expectations mean you won’t get frustrated. Clean in stages. Multiple sessions are normal and effective.
Troubleshooting Steam Cleaning Issues
No steam coming out? Check water level first. If it’s full, your unit might not be fully heated. Wait the full heating cycle before assuming failure. If still no steam after heating: the unit might be mineral-clogged. Run a vinegar-and-water solution through it to clear deposits. Some units have a “pressure release” valve, make sure it’s fully closed.
Water dripping instead of steam? Temperature is too low. Increase the heat setting and wait 30 seconds. If it persists, the heating element might be failing. Professional repair or replacement is necessary at this point.
Buildup not softening even after repeated passes. Some deposits are so old and carbonized that steam alone won’t budge them. Try the baking soda paste pre-soak mentioned earlier. If that fails, these might need professional steam cleaning (commercial-grade pressure equipment).
Steam cleaner shutting off randomly. Thermal cutoff switch engaged, likely due to low water level or overheating. Refill the tank, let it cool for 5 minutes, and restart. If it keeps happening, the thermostat might be faulty. Check your unit’s warranty.
Mineral scale building up inside the unit. This happens with tap water over time. Run a vinegar-water solution (1:1 ratio) through the system every 5–10 uses. Let it sit for 15 minutes, then flush with distilled water. Preventive maintenance beats emergency repairs.
When To Call A Professional
Steam cleaning handles 95% of home oven jobs. But sometimes professional intervention is worth it:
- Severely damaged enamel or seals. If your oven has cracked enamel, a broken gasket, or failing heating elements, steam cleaning is only cosmetic. The underlying issues need professional repair.
- Persistent odors after cleaning. If your oven still smells like burning after a thorough steam clean, residue might be inside the walls or heating elements. Professional disassembly and deep cleaning is required. DSOGaming won’t help here, but a qualified appliance technician will.
- Commercial kitchens or heavy-duty usage. Restaurant equipment accumulates grease differently than home ovens. Commercial steam systems (3+ bar pressure) are necessary, requiring professional operation.
- Insurance or warranty considerations. Some oven warranties void if you disassemble or use high-heat cleaning methods. Check your paperwork before attempting anything aggressive.
- Time constraints. Professional cleaning services finish in 2–3 hours what might take you a full day. If time is scarce, outsourcing makes sense. Expect to pay $150–$400 depending on oven size and buildup severity.
For standard home ovens and regular maintenance, DIY steam cleaning is entirely viable and cost-effective. Professional help is a backup option, not a requirement.
Conclusion
Steam cleaning your oven is the meta shift your kitchen deserves. It’s faster than chemical cleaners, safer for your hands and lungs, and more environmentally responsible. The investment in a quality steam cleaner pays dividends across your entire home, oven, stovetop, counters, tile, windows, you name it.
The process is straightforward: gather your gear, prep the space, heat your unit, and methodically work through the oven from top to bottom. Wipe as you go, tackle stubborn spots with patience and pre-soaking, and don’t expect perfection in one session. Multiple passes over time beat brute-force single attempts.
Post-cleaning maintenance extends your oven’s life and reduces future buildup. Line surfaces, wipe spills immediately, and use splatter guards. Your future self will thank you for the reduced workload. As with competitive gaming, prevention and smart positioning beat reactive scrambling every time.
Whether you’re preparing for guests, reclaiming your kitchen from accumulated grime, or just upgrading your household maintenance routine, steam cleaning delivers results without compromise. Grab a decent handheld steam cleaner, carve out a weekend morning, and experience the satisfaction of a genuinely clean oven. Your next baked dish will taste better knowing it’s cooking in a pristine environment, and that’s worth the effort. With consistency and the tips above, you’ll maintain an oven that looks brand-new for years to come.