Steaming shrimp might seem straightforward, but there’s a real difference between rubbery, overcooked shrimp and perfectly tender seafood that tastes fresh off the boat. Like mastering a new game mechanic, knowing the exact timing, temperature, and technique transforms the entire experience. Whether you’re meal prepping for the week or hosting a dinner party, steamed shrimp delivers restaurant-quality results without the complexity of other cooking methods. This guide walks through everything, from equipment selection to plating, so you can nail it every single time, no trial and error required.
Key Takeaways
- Steaming shrimp preserves moisture and natural flavor better than boiling or pan-searing, delivering tender, sweet seafood with minimal effort.
- Medium to large shrimp (21/25 to 26/30 count) are ideal for steaming as they cook evenly; timing ranges from 4–11 minutes depending on size, with frozen shrimp requiring 2–3 extra minutes.
- Use flavorful steaming liquids like broth combined with aromatics (lemon, garlic, bay leaves, thyme) and fresh herbs to build depth without overpowering delicate shrimp meat.
- Pat shrimp dry after thawing and arrange them in a single layer without crowding to ensure even cooking and perfect texture.
- Properly cooked steamed shrimp are opaque pink throughout with only a hint of translucency at the center; remove them immediately when done to avoid overcooking.
- Steamed shrimp work with diverse flavor profiles—Asian-inspired with soy sauce and sesame, Mediterranean with white wine and herbs, or bold Cajun with Old Bay—making them versatile for any meal.
Why Steaming Is the Best Cooking Method for Shrimp
Steaming shrimp preserves moisture and delicate flavor in ways that frying or boiling can’t match. When shrimp hit boiling water, they cook too fast and often absorb excess water, diluting their natural taste. Pan-searing works but demands constant attention and can create hot spots that overcook parts of the shrimp while leaving others undercooked. Steaming, by contrast, uses gentle, even heat that cooks shrimp uniformly from edge to center.
The magic of steaming lies in how moisture circulates around the shrimp without submerging it. This keeps the meat tender and sweet while the shell helps lock in juices. Shrimp are naturally lean, they’re mostly protein, so steaming prevents the drying-out that happens with higher-heat methods. You also get cleaner, more subtle flavors since the shrimp isn’t bathed in water that strips away natural salts and oils.
Another huge advantage: steaming is forgiving. The consistent temperature and humidity mean you have a slightly wider window before shrimp overcook, compared to pan-searing where seconds matter. For a casual cook or someone still dialing in technique, that buffer is genuinely helpful. Plus, cleanup is minimal, no splattering oil, no boiling water overflow, no stuck-on residue.
Essential Equipment and Ingredients You’ll Need
Steaming Equipment Options
You don’t need fancy gear. A basic bamboo steamer, metal steamer basket, or even a colander suspended over boiling water works fine. The key is keeping shrimp above the water line where steam does the work.
Bamboo steamers (two-tier or three-tier stacks) are cheap, widely available, and excellent for shrimp. They stack easily, hold heat well, and the natural bamboo doesn’t conduct heat as aggressively as metal, reducing the risk of overcooking the bottom layer. You’ll need a pot or wok underneath, fill it with about 1–2 inches of water.
Metal steamer baskets are durable and last forever. They’re easier to clean than bamboo and handle higher heat if you’re steaming multiple batches. They do heat up faster, so pay closer attention to timing.
Instant Pot or pressure cooker streamlines the process. Set it to steam mode, use the trivet (that little metal stand), add your liquid, and the timing is locked in. This is ideal for larger batches or if you’re meal prepping.
Stovetop option: A simple metal colander or perforated insert placed over a pot of simmering water works if you have nothing else. Cover it loosely with foil to trap steam.
Choose based on what you already own. No need to buy gear if a colander-and-pot setup gets the job done.
Selecting Quality Shrimp
Fresh or frozen shrimp both work, but sourcing matters. Look for wild-caught shrimp if possible, they tend to have firmer texture and cleaner taste than farmed varieties, though both are fine. Size is labeled by count per pound (e.g., 16/20 means 16 to 20 shrimp per pound). Medium to large shrimp (21/25 to 26/30 count) are ideal for steaming because they cook evenly and are easier to peel and eat.
If buying frozen, check that shrimp are frozen solid without ice crystals (a sign of thawing and refreezing). The flesh should be grayish-white or pink, not brown or discolored. Avoid pre-cooked frozen shrimp unless you’re just reheating, cooking them again dries them out.
If you’re lucky enough to find fresh shrimp at a reputable fishmonger, buy them the day you plan to cook. They should smell briny and ocean-fresh, never ammonia-like. Fresh shrimp cook slightly faster than frozen, so adjust timing down by 30 seconds or so.
Seasonings and Flavor Boosters
Steaming liquid is where you build flavor without overpowering delicate shrimp meat. Water alone works but feels bland. Instead, use chicken broth, vegetable broth, or a light seafood stock as your base. This adds depth immediately.
Add aromatics directly to the steaming liquid: fresh lemon slices, garlic cloves, bay leaves, and fresh thyme or dill. These infuse the steam without requiring you to season individual shrimp. White wine (about 1/4 cup per pot) adds brightness. Ginger slices, star anise, and Sichuan peppercorns work if you’re leaning Asian-inspired.
For the shrimp themselves, salt and white pepper applied lightly just before steaming is enough. Paprika or Old Bay seasoning (traditional for Gulf shrimp) can go directly on the shrimp or into the steaming liquid. Garlic powder, onion powder, and cayenne are other straightforward additions, use sparingly to complement, not mask, the shrimp’s natural flavor.
Fresh herbs are your friend: cilantro, parsley, and chives can be scattered on top after steaming or folded into a dipping sauce. Soy sauce, fish sauce, and lime juice pair beautifully if you’re building an Asian flavor profile.
Preparing Your Shrimp Before Steaming
Thawing Frozen Shrimp Properly
Never thaw shrimp at room temperature, bacteria multiply fast, and you risk foodborne illness. Refrigerator thawing is the safest method: place frozen shrimp in a bowl, cover them, and let them sit in the fridge for 8–12 hours or overnight. This gradual thaw keeps them at a safe temperature while water drains from the packaging.
If you’re in a rush, use the cold water method. Place shrimp in a sealed bag or colander and submerge in cold water. Change the water every 30 minutes. Shrimp thaw in 1–2 hours depending on size. Never use hot water, it starts cooking the exterior while the center stays frozen, resulting in uneven texture.
Some cooks skip thawing entirely and steam frozen shrimp directly. This works but adds 2–3 minutes to cooking time. The shrimp won’t thaw evenly, so you risk overcooked edges and an undercooked center. Thawing first gives you more control.
Once thawed, pat shrimp dry with paper towels. Excess moisture creates steam inside the pot rather than around the shrimp, potentially extending cooking time and inviting overcooking.
Cleaning and Deveining Techniques
The black line running along the back of a shrimp is the digestive tract (the “vein”). It’s not dangerous, just sediment, but removing it improves appearance and mouthfeel. Some people skip this for small shrimp: it’s a judgment call.
To devein, run a sharp paring knife down the back of each shrimp, just deep enough to expose the vein. Slide the blade under the vein and lift it out. Rinse the shrimp under cold water to clear any residual bits. A shrimp deveiner tool (a small curved blade with a handle) speeds this up if you’re doing large batches, it’s about $5 and lives in kitchen gadget purgatory but actually works well.
Shell-on vs. peeled is your call. Shell-on shrimp protect meat during cooking, keep it juicier, and are traditional for boil-and-steam setups. Peeled shrimp (with or without the tail) cook slightly faster and are easier to eat straight from the plate. Peeled shrimp lose a bit of their natural protection, so watch timing more carefully.
For shell-on shrimp, a quick rinse under cold water removes any debris. No need to scrub hard, you’ll damage the delicate meat. For peeled shrimp, rinse similarly. If the shrimp have an icy glaze (from vacuum-sealing), a brief rinse clears that too.
Once cleaned and deveined, pat dry and proceed immediately to steaming. Wet shrimp introduce excess moisture: dry shrimp cook more evenly.
Step-by-Step Guide to Steaming Shrimp
Setting Up Your Steamer
Start by filling your pot with 1–2 inches of steaming liquid (water, broth, or wine) and bringing it to a boil over medium-high heat. For a bamboo steamer, place it directly over the pot with the water simmering, not boiling, aggressive boiling creates too much steam and can overcook shrimp.
If using a metal steamer basket, secure it in the pot so it doesn’t sit directly in water. The basket should be elevated, not submerged. Similarly, if you’re rigging a colander over a pot, rest it on a heatproof stand or even a clean, heat-safe ramekin, anything that keeps it above the water line.
Add your aromatics (lemon slices, garlic, bay leaves, thyme) directly to the steaming liquid before heating. This flavors the steam from the start. Once the steam is rising (you should see visible vapor), you’re ready for shrimp.
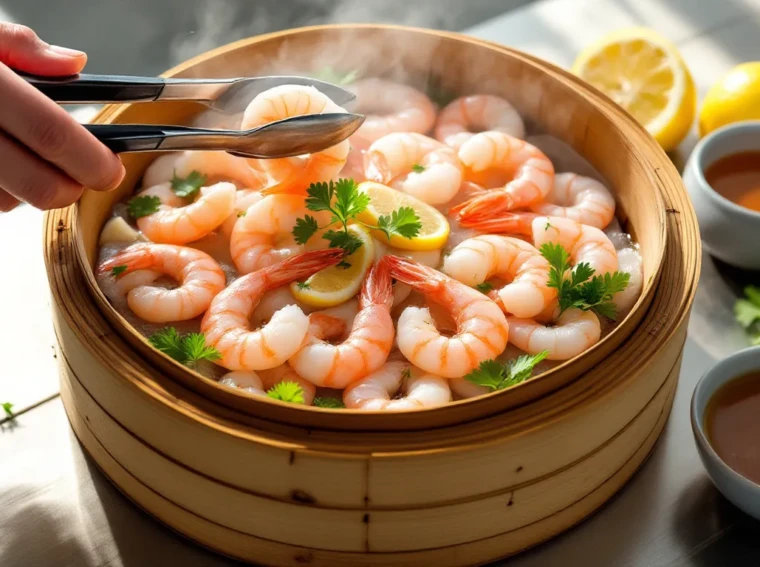
Arrange shrimp in a single layer on the steamer, don’t crowd them. Overlapping shrimp cook unevenly, with the bottom ones potentially overcooked and the top ones underdone. If you have too many, use multiple tiers of a bamboo steamer or work in batches. Shrimp cook fast enough that batching doesn’t take long.
Cooking Times and Temperature Control
Shrimp size dictates timing more than anything else. This is where precision matters.
Medium shrimp (21/25 count): 4–5 minutes
Large shrimp (16/20 count): 5–7 minutes
Extra-large shrimp (13/15 count): 7–9 minutes
Jumbo shrimp (under 13 count): 9–11 minutes
Frozen shrimp add 2–3 minutes. Shell-on shrimp take slightly longer than peeled because the shell insulates the meat.
Keep the steam at a steady, medium level. Too high and you’re essentially boiling the shrimp in steam, they’ll overcook rapidly. Too low and cooking slows way down. Once you’ve placed shrimp on the steamer, set a timer immediately. Seconds matter here.
Watch for the first signs of doneness as you approach the time window. Don’t just wait for the timer: peek inside the steamer without fully lifting the lid (steam escapes and cools things down, but a quick glance is fine).
Testing for Doneness
Done shrimp are opaque pink throughout, with just a hint of translucency at the very center. The tail should curl slightly but not aggressively. Overcooked shrimp are fully opaque white, curled tightly into a C-shape, often with a slight rubbery appearance.
The safest test: remove one shrimp with tongs and cut it in half lengthwise. The center should be mostly opaque pink, perhaps with a very thin line of translucency. If it’s still grayish and soft, it needs another minute. If it’s fully white and firm, you’re done.
Alternatively, press a shrimp gently with your finger. Undercooked shrimp feel soft and squishy. Perfectly cooked shrimp have a slight firmness but still feel tender. Overcooked shrimp are hard and dense.
Once shrimp are done, remove them from the steamer immediately. They continue to cook gently as they cool, so pulling them off the heat when they’re still slightly underdone (visually, a hair short of fully opaque) actually results in better texture. This carryover cooking is subtle but real.
Place cooked shrimp in a bowl or plating vessel. If you’re steaming multiple batches, lay them on a clean plate to cool slightly while you steam the next batch, don’t pile hot shrimp on top of each other.
Flavor Variations and Seasoning Ideas
Asian-Inspired Steaming Blends
An Asian approach leverages umami and aromatics that complement shrimp naturally. Build your steaming liquid with chicken broth or seafood stock, then add 2–3 slices of fresh ginger, 2–3 garlic cloves (smashed), two star anise, and a 2-inch piece of dried kombu seaweed if you have it. A splash of rice wine vinegar (about 2 tablespoons per 2 cups of liquid) adds brightness.
Once shrimp are steamed, drizzle with a simple sauce made from soy sauce, sesame oil, rice vinegar, and a pinch of sugar. Scatter fresh cilantro, sliced green onions, and toasted sesame seeds on top. Serve with steamed rice or alongside stir-fried vegetables.
For a Vietnamese twist, incorporate lemongrass and Thai bird’s-eye chilies into the steaming liquid. After cooking, plate the shrimp and top with a dipping sauce of lime juice, fish sauce, minced garlic, and sliced red chili. The combination is bright, spicy, and addictive.
Mediterranean and Cajun Approaches
Mediterranean flavoring centers on white wine, fresh lemon, and herbs. Use 1 cup white wine mixed with 1 cup vegetable or seafood broth as your steaming liquid. Add several slices of fresh lemon, 4–5 fresh thyme sprigs, 2 bay leaves, and a few garlic cloves. Once shrimp are cooked, finish with a drizzle of good olive oil, a squeeze of fresh lemon, and a scatter of fresh parsley and dill. Serve with crusty bread or alongside a simple salad.
Cajun-style embraces bold spice and tradition. Mix your steaming liquid with a touch of seafood or vegetable broth and add Old Bay seasoning directly to the liquid (about 1–2 tablespoons per 2 cups). Include smashed garlic cloves, bay leaves, and a squeeze of lemon. Some cooks add a small splash of hot sauce or Worcestershire sauce for depth. After steaming, toss shrimp in melted butter mixed with more Old Bay, paprika, and cayenne to taste. Serve with corn, potatoes, and andouille sausage if you’re going full boil-inspired, or keep it simple with garlic bread.
Common Mistakes to Avoid
Overcrowding the steamer is the most frequent mistake. Shrimp piled on top of each other steam unevenly. The bottom layer sweats in condensation while the top layer cooks slower. Solution: Use a single layer, even if it means multiple batches. Steaming shrimp takes 5–10 minutes tops, so batching isn’t a burden.
Boiling instead of steaming happens when you turn the heat too high or use too much water. Your shrimp end up in boiling water rather than steam, defeating the point. Keep water below the steamer basket level and maintain a medium simmer that produces steady, not aggressive, steam.
Not seasoning the steaming liquid leaves you with bland shrimp. Water alone is a missed opportunity. At minimum, add salt, lemon slices, and a bay leaf. Broth takes 10 seconds longer but delivers noticeably better flavor.
Skipping the dry-off step after thawing introduces excess moisture that slows cooking and invites uneven results. Take the two seconds to pat thawed shrimp dry with a paper towel.
Starting the timer before steam is rolling means you’re actually steaming for less time than you think. Wait until you see visible steam rising from your steamer, then place shrimp and start timing. This takes 2–3 minutes of preheating: don’t skip it.
Leaving shrimp on the steamer after they’re done is tempting if you’re distracted, but it’s an easy way to overcook them. Set a timer on your phone if you tend to wander off. Once done, get them off immediately.
Using pre-cooked frozen shrimp and steaming them again dries them out beyond repair. If you buy pre-cooked shrimp, thaw them and eat them cold or toss in a quick pan with butter for 30 seconds to warm, don’t steam.
Not adjusting for frozen shrimp, or assuming the timing is the same as fresh, leads to undercooked centers. Frozen shrimp genuinely need 2–3 extra minutes. When in doubt, test a shrimp by cutting it open rather than guessing.
Serving and Storage Tips
Pairing Steamed Shrimp with Sides
Steamed shrimp are versatile enough to pair with almost any side, but a few combinations shine. Rice or couscous absorbs sauce beautifully, especially if you’re serving shrimp with a pan sauce or dipping liquid. Jasmine rice works with Asian flavors: couscous complements Mediterranean preparations.
Roasted or steamed vegetables (broccoli, snap peas, asparagus, zucchini) round out the plate with color and nutrition. Toss them in the same sauce as the shrimp for cohesion. A simple green salad with vinaigrette provides acidity that cuts through richer preparations.
Crusty bread or garlic bread is essential if you’re serving shrimp with a sauce meant for dipping or sopping. Lemon or herb-infused olive oil works great for drizzling over bread alongside steamed shrimp.
Potatoes, boiled, roasted, or mashed, work especially well with Cajun or Mediterranean shrimp. Corn fits the Gulf-coast vibe.
Avoid pairing steamed shrimp with anything too heavy. They’re naturally delicate, so rich cream sauces or breaded sides can overwhelm them. Keep sides bright and complementary rather than competing for attention.
Proper Storage and Reheating Methods
Cooked steamed shrimp keep in an airtight container in the fridge for 3–4 days. Let them cool to room temperature before storing to avoid condensation buildup. Pat them dry before sealing the container.
To reheat, place shrimp in a steamer basket over simmering water for 1–2 minutes (just to warm through), or toss them in a hot pan with a touch of butter for 30–60 seconds. Don’t overdo reheating, or they’ll become tough. If you’re serving cold (as in a shrimp cocktail), skip reheating and pull them straight from the fridge.
For longer storage, freeze cooked shrimp in an airtight freezer bag for up to 3 months. Thaw in the fridge overnight before reheating. The texture won’t be quite as pristine as fresh (ice crystals slightly damage the meat), but taste and edibility remain solid.
Cooked shrimp smell clean and briny when fresh. If they develop any ammonia smell or discolored patches, discard them, that’s your signal they’ve gone bad. Trust your nose: it’s your best safety tool.
Conclusion
Steaming shrimp is genuinely one of the easiest, most reliable cooking methods in your arsenal, and it delivers results that hold their own against restaurant prep. The technique boils down to a few core principles: use steady, gentle steam: nail your timing based on shrimp size: and pull them off heat the moment they’re done. Master those, and you’re making better shrimp than most casual cooks without breaking a sweat.
The beauty of steaming is its flexibility. Whether you’re working with an Instant Pot, a bamboo steamer, or a rigged colander-and-pot situation, the fundamentals stay the same. Flavor variations range from bold Cajun spice to delicate Mediterranean herbs to umami-rich Asian preparations, all equally simple to execute. You’re not juggling complex technique: you’re just choosing your flavor direction and letting steam do the work.
Once you’ve nailed basic steamed shrimp, everything else follows naturally. Cold shrimp salads, shrimp tacos, pasta dishes, stir-fries, they all start with properly cooked shrimp. Invest the mental energy upfront to dial in your timing and procedure, and you’ll execute this technique flawlessly every time. That’s the point: reliability, simplicity, and delicious results, every single cook.